Fonts are the foundation of your site’s typography and one of the first steps when creating a custom Nyla site. In Nyla, you add fonts once and then reference them in typography design tokens to ensure consistency across headings, text blocks, CTAs, and forms.
- Supported sources: Google Fonts, Adobe Typekit, and Custom uploads.
- Each weight and style (e.g., Regular, Bold, Italic) must be added to be available in typography tokens.
- Always confirm you have the correct license to use any fonts you use.
Tip: Keep the number of fonts to a minimum for best site performance (we recommend fewer than 3–4 families).
To add a font, go to Design → Fonts and click on the + icon. Choose a source, configure the font, and add the different weights and styles you want to use. In the Advanced fieldset you can enable font smoothing and set fallback fonts.
Remember: you need to Save, Queue, and Publish changes for fonts to appear live on your site.
Google fonts
- In the Source field, select Google.
- Enter the font family name exactly as shown in Google fonts.
- You can find this in the CSS rules to specify families section after selecting a font on Google Fonts.
- Add individual weights and styles (e.g., Regular 400, Bold 700, Italic 400) in Styles
- Save, Queue and Publish.
Typekit
- Create a Web Project in Typekit with your desired fonts.
- In Nyla, select Typekit as the source.
- Enter your Typekit project and font family
- Add each font and style in Styles
- Save, Queue and Publish.
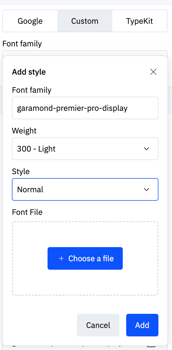
Custom
- Select Custom as the source.
- Upload your font file(s) for each style you’re uploading.
- Preferred format: .woff2 (smaller, optimized for the web).
- Alternative: .ttf if .woff2 is unavailable.
- Complete the font settings (family name, weight, style).
- Save, Queue and Publish.
Fonts and Typography Tokens
Once added, fonts can be used in Typography design tokens. Some things to note:
- Each typography token references a single font style.
- Rich text automatically uses the correct bold and italic versions if those files are uploaded.
Example:
- If you add Avenir Regular (400), Bold (700), and Italic (400 Italic):
- A typography token set to Avenir Regular will automatically display bold and italic when styled in Rich text.
Setting Fallback Fonts
You can set custom fallback fonts in the Advanced fieldset under Fallback. Provide values in the same format as a CSS font-family, without the closing semicolon:
"Arial", "Helvetica", sans-serif
If nothing is added, the default system stack is used:
“-apple-system”, “BlinkMacSystemFont”, “Segoe UI”, “Roboto”, “Oxygen”, “Ubuntu”, “Cantarell”, “Open Sans”, “Helvetica Neue”, “sans-serif”
Fallback fonts ensure your text remains legible and performant if the primary font fails to load.
Best Practices
- Upload only the weights and styles you will actually use (e.g., Regular, Bold, Italic).
- Use .woff2 where possible for custom fonts for faster loading.
- Limit total font families to 3–4 maximum.
- Avoid uploading many weights from the same family unless required.
- Ensure you have the correct license for any custom fonts before uploading.
- Be mindful of concurrency issues when working with Design Tokens. Read more here.
Related Reading
- Typography Styles in Nyla – how fonts are used in typography tokens.
- Publishing in Nyla – how to publish font and token changes live.